ITpipes Mobile - Import an Existing Video
How do I import an existing video and create inspections with an observation?
- Select to start a new inspection.
- Select .to go back to the asset screen.
Import Video
ITpipes Mobile has the ability to import a video, such as a push camera video, if there is no video attached to the inspection. To import a video:
Select .
Browse to the media location and select the video.
Video Controls

Use the video time slider to adjust the position in the video.

- Jumps to the beginning of the video.
- Skips back 5 seconds.
- Pauses the current video.
- Plays the current video.
- Skips forward 5 seconds.
- Jumps to the end of the video.
- Displays a larger view of the current video.
Snapshot Control
To change the image for the shown snapshot select the observation from the observation details.
Select to view a list of the snapshots for the selected inspection.
Observation Entry
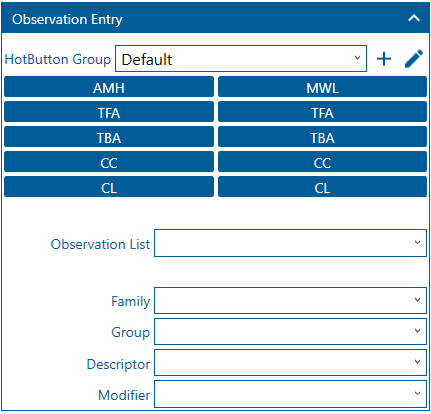
While recording a video or editing an inspection. Observation Entry becomes available. Observation Entry allows the ability to enter observations while recording or reviewing. It contains HotButtons and HotButton Groups. For more information on HotButtons proceed here.
Adding an Observation
To achieve desired codes, select Group, Descriptor, and Modifier options from the individual drop downs.
Input the distance of the observation in the distance field.
Input Value 1st dimension, Value 2nd dimension, Value Percent, Joint, and Continuous. Note: These options are per code and will change with each code. Required fields are marked with a red.
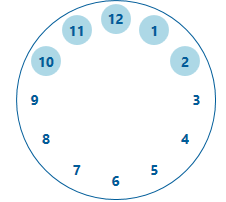
Either select the From clock position and/or To clock position from the drop downs or on the clock image.
Left click provides the From clock position.
Right click provides the To clock position.
Input remarks if desired.
Once completed select to save the observation. Note: The snapshot that will be taken, will be from the video’s current location.
Modify an Observation
To modify an observation, select the observation and select .
Make desired modifications.
Once completed, select to save the modification.
Closing Continuous Defect
To close a continuous defect. Select the observation that contains the continuous defect to be closed.
Select.
Input the required fields.
Related Articles
ITpipes Web - import an existing video
How do I import an existing video and create inspections with an observation? The instructions below will show you how to do this using ITpipes Web. Adding an asset To add an asset, select , located below the toolbar. Adding an inspection To add an ...ITpipes Mobile in the Field or Office
While ITpipes Mobile can be used on a laptop or pc, and that device could be in the field or office, ITpipes Mobile is designed for field use. ITpipes Mobile does not have all the functionality of ITpipes Web for editing, review, and reporting. ...ITpipes and ESRI Documentation
Table of Contents Introduction ITpipes integration with an ESRI geographic information system (GIS) is a powerful way to leverage the capabilities of these advanced systems. This document covers various components of this integration. The purpose of ...ITpipes Education - User's Manual, Quickguides, Training Videos
Users Manual Here is a link to ITpipes Users Manuals: ITpipes Web ITpipes Mobile ITpipes Sync Quickguides ITpipes Mobile ITpipes Sync Training Videos Links to available training videos. Best when viewed full screen. ITpipes Web Creating a WO - ...ITpipes Desktop Education - Users Manuals, Training Videos, Quickguides
ITpipes Desktop/Legacy Product Important Announcement 1) ITpipes Desktop is no longer in active development (since pre-2018). ITpipes Desktop was developed using VB 6. ITpipes Desktop is recommended to be used on Microsoft Windows 7. Microsoft does ...