How to send ITpipes data via ShareFile and FileZilla FTP
Sharefile Account
You will need an ITpipes provided sharefile account in order to send data to ITpipes. Please fill out this form to request one.
Download FileZilla
If you do not already have FileZilla FTP Client, you can find the download link here.
Connecting to ITpipes
After installing FileZilla, you will now tell it to connect to ShareFile.

Go to the File menu and click on “Site Manager”

Click “New site”

Give the new site a name. IE.) ITpipes

Use the Encryption dropdown to select “Require implicit FTP over TLS”

Enter the Host: itpipes.sharefileftp.com
Enter your User: ITpipes/ and then whatever your email address is. IE.) ITpipes/bob@itpipes.com
Enter your Password. This is the password that you chose when setting up the ShareFile account. If you do not know what your password is, please contact the ITpipes tech support.
Settings
These are the recommended settings to use. Other settings may be adjusted based on your specific needs.
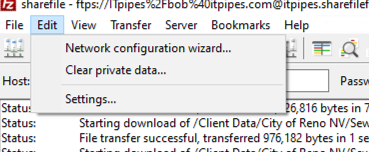
Go to the Edit menu and click on “Settings…”

Click on Connection and change the Timeout in seconds to 200.
Change the Maximum number of retries to 8. (10 is the max, but ShareFile only supports 8)

Click on Transfers
Under Concurrent transfers, set the Maximum simultaneous transfers to 10.

Click on “File exists action”.
Set both the Downloads and Uploads to “Resume file transfer.”
Uploading Files

Open the Site Manager
Choose ITpipes
Click “Connect”

Navigate to where the files are stored locally on your computer.
Drag any or all of the files from the left window to the right window.
Left window - Your files
Right window - ITpipes ShareFile files

FileZilla will begin to upload the files.
Downloading Files
The same process described above is used to download files from ITpipes Sharefile.
Drag and drop the files from the right window to the left window.
The files will begin downloading.
Troubleshooting
Many things can cause a file not to upload correctly. There is a Failed transfers tab at the bottom of the FileZilla window. Each file will be listed. To retry uploading the failed files, please follow these steps.
Failed Transfers

Click on the Failed transfers tab.

Right-click on the tab and click “Reset and requeue all”.
Do not click Remove all, or the file uploads will not be retried.

The failed files will now appear in the Queued files tab.

Click on the Transfer menu.
Click Process Queue

The failed files will now be uploaded to the ITpipes ShareFile.
Additional Troubleshooting - Folder/File size limitations in Windows
If file transfer issues persist, it is possible that the file name lengths and/or folder lengths are too long. Please try to place the files into a shorter file folder structure and retry the file transfer.
Related Articles
Legacy Data Migration - what to send to ITpipes?
Prior to starting an implementation, that includes legacy data migration, the legacy data needs provided to ITpipes and a form needs completed. The data sent to us for migration should include the following: A single database that houses all assets ...Legacy Data Migration - Interim Data during Services Project or Implementation
During an implementation or services project, often interim data needs followed up on. This is data collected or obtained between the time of the data being sent to ITpipes and the data going back to the client and/or the new system being used. There ...How to get data to ITpipes.
When providing files to ITpipes there are options, including: 1) Sharefile - upload your data to ITpipes (less than 1 TB) 2) Client FTP, site access, or another download link 3) Hard Drive shipped to ITpipes **Please note that if the data is over ...ITpipes and ESRI Documentation
Table of Contents Introduction ITpipes integration with an ESRI geographic information system (GIS) is a powerful way to leverage the capabilities of these advanced systems. This document covers various components of this integration. The purpose of ...Data Migration Review Recommendations
No one knows your data like you. This article provides recommendations on data QA/QC checks for reviewing data converted into ITpipes. ITpipes SmartTabs will be invaluable for doing QA/QC on data and we recommend attending ITpipes Web Usage training ...